VTubing offers such an amazing opportunity to break down global barriers and connect with streamers and viewers across the globe. As a streamer, I’m constantly wondering what I can do to improve the accessibility of my content, whether that be alt text on social media, live captions on stream, or manually captioned highlight videos and clips. But what about language accessibility?
You may have seen some VTubers (especially Japanese ones) use a fantastic tool called JimakuChan. It’s worth a look and has proven to be quite effective. That said, I had a few requirements that left me seeking another approach:
- I already use OBS-captions-plugin, which leverages Google speech recognition to push machine generated captions to Twitch’s caption track or an OBS text source. Rather than introducing another tool, could I just leverage this one?
- JimakuChan’s documentation indicates that it requires window capturing Google Chrome (browser sources are not compatible). To reduce background resource usage, I wanted something that could exist entirely in OBS via plugins.
- JimakuChan uses Google Translate, which is historically less than ideal for translating between Japanese and English, especially with informal, short utterances. Could I use something else? DeepL perhaps?
- I didn’t want to open a local webserver on my computer unless absolutely necessary, which unfortunately eliminated the OBS-polyglot project. Using local resources during a stream to run an LLM wasn’t exactly my favorite idea either. I’m keeping this one in my back pocket, though, as it’s very compelling.
With all this in mind, I came up with the following combination. We’ll break down the setup below.
This walkthrough assumes you’ve already installed the above two plugins. If you haven’t used the caption plugin before and would like some assistance, definitely take a look at its GitHub documentation or check out a tutorial.
1. Preparing Your Scenes and Sources
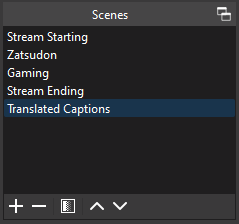
First, we’ll build a scene to contain our translation elements. This will let us overlay captions across scenes and give us a single toggleable source to start and stop translations (great for Stream Deck users).
- Create a new Scene, naming it as you like.
- Add three sources. We’ll configure these later:
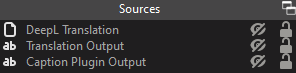
- URL Source: To send caption data to/from the DeepL API. I named mine, “DeepL Translation.”
- Text: For your translated captions to appear in. I named mine, “Translation Output.”
- Text: For the caption plugin to output what you say. I named mine, “Caption Plugin Output.”
- Add your Translated Captions scene as a Scene Source to the scenes where you’d like captions to appear. I place mine at the top to ensure it remains visible and then lock it so it won’t move around.

2. Configuring Caption Output
Next, we want our caption plugin to output what we’re saying to the text source we created above.
- Open the settings for the caption plugin.
- Edit the Caption Timeout value to something shorter (I use “7.0”). You may need to tweak this based on your preferences for how long a caption stays visible after you stop speaking.
- Switch to the “Open Captions” tab and click the “Add Text Output” button, configuring it as follows:
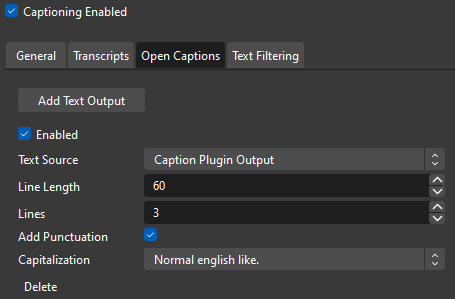
- Text Source: Caption Plugin Output
- Line Length: 60
- Lines: 3
- Add Punctuation: Checked
- Capitalization: Normal English like
- Click Save.
You may need to adjust your line length and lines depending on your speech and preferences.
3. Configuring Translation
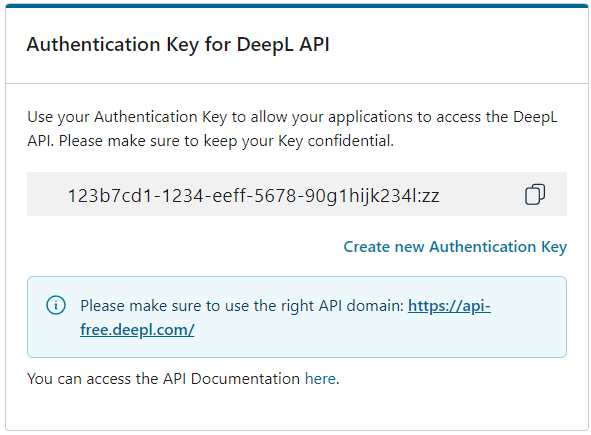
If you haven’t already, head to the DeepL website and sign up for the Free API tier. You’ll need to provide a credit card for verification purposes, but won’t be charged.
DeepL Free API allows you to submit 500,000 characters per month for translation. In testing, I used about 70,000 during one hour of streaming. This may not be enough for a lot of usage, but should be fine for occasional translated sessions and testing.
- Open the properties for the DeepL Translation URL Source you created earlier, then click the “Setup Data Source” button.
- Note your DeepL authentication key. You can find that at the bottom of your DeepL account page.
- Configure the data source as follows:
- Source: URL –
https://api-free.deepl.com/v2/translate - URL Request Options
- Method: POST
- Headers:
- Authorization
DeepL-Auth-Key put-your-key-here - Content-Type
application/json
- Authorization
- Dynamic Input: (Text) Caption Plugin Output
- No empty: Checked
- No same: Checked
- Agg: Unchecked
- Body: The below code snippet assumes captions will originate in English and be translated to Japanese. For additional language codes, see DeepL’s API Documentation.
{"text": ["{{input}}"], "target_lang": "JA", "source_lang": "EN"}
- Output Parsing Options
- Content-Type: JSON
- JSON Pointer:
/translations/0/text - JSON Path: Remove any existing values
- Source: URL –
- Your HTTP request configuration will look something like this. Click Save when you’re finished.

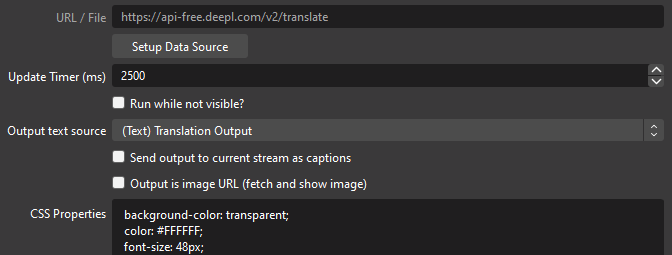
- Configure a few additional options:
- Update Timer: 2500
- Run while not visible: Unchecked
- Output text source: (Text) Translation Output
- You may need to adjust the update timer depending on how often you want to send text to DeepL and update the captions on screen. The final settings will look like the screenshot below.
4. Format Your Subtitles
Our final step will be to format the Translation Output text source so your captions look good. Tweak your configuration as needed for your layout, but I use the following settings:
- Font
- Font Family: UD Digi Kyokasho N-B (Zen Kurenaido is a great Japanese handwriting font alternative)
- Font Size: 48
- Color: #ffffff
- Background: None
- Alignment: Center, Top
- Outline: Checked
- Outline Size: 12
- Outline Color: #000000
- Outline Opacity: 100%
- Use Custom Text Extents: Checked
- Width: 1000
- Height: 150
- This should accommodate around three lines of text at the above size
Once that’s all set, place your subtitle source where you want it to appear on stream. If you want the source captions to appear on screen, you can configure the “Caption Plugin Output” source similarly.
5. Using Translated Subtitles
Once everything is all set, you’re ready to test and get translating! If you aren’t live, the caption plugin’s Show Preview button (available in its settings UI) will activate transcription in a pinch. You could also start a stream in Bandwidth Test Mode.
For translations to flow, you need to ensure both the “DeepL Translation” and “Translation Output” sources are visible. Making the translation source visible activates your API calls while the output source makes your beautiful subtitles appear on screen.
Want to stop translations? I recommend hiding both of these sources. Otherwise, if you only hide “DeepL Translation,” stale text might show on the “Translation Output” source indefinitely.
For Steam Deck users, this is a great opportunity to use a Multi-Action Switch command!
Final Thoughts
I hope you enjoy this little foray into bridging existing caption workflows with translations. This is a pretty powerful approach that should allow for flexibility and extensibility in the future. DeepL’s alpha “context” feature might prove interesting to help improve translation output quality, too. I encourage you to experiment and see what works best for you.
Many thanks to the plugin developers for their work over the past few years. I’m very excited to see what else can be done with the API source plugin, specifically!
Happy translating! I hope you and your viewers find this useful.

Disclaimers
Machine generated captions are not an adequate replacement for human captioning in scenarios where high accuracy is required, such as for accommodation compliance. Similarly, translations generated via Google, DeepL, or other tools should generally not be considered authoritative.
Machine caption accuracy will vary depending on the quality of the source audio, the speaker, and the selected tool. Translation quality will further vary based on the accuracy of the source text and the selected tool.